
and if you want to see it lined out: check this out
!!
Colin

The motor arrived back today (hooray) but now we have another problem….
As you can see above, both the motor shaft and the gearbox have the same connector on them so they cannot ‘mate’!
The motor will have to go back and be replaced. Unbelievable.
Colin
Really need that motor now!
The handrails are attached using 16BA nuts at the top and 14Ba at the bottom. You can hardly see the 16BA ones, good job I didn’t drop any! I really need that motor now as almost everything depends on having that in place next. Come on Mr postman.
Colin


I really need that motor now – fingers crossed it arrives today in the post.
As you can see, with the assistance of a hairdryer I painted the firebox matt black yesterday allowing me to install the backhead fittings. Beforehand I had a go at weathering and distressing it, firstly partly scraping off the black paint and then adding another mist coat of black over the top. This gave the impression of peeling paint in some small areas. Then I rubbed parts of it down with a fibreglass brush to break up the uniformity of the black. Then I dry brushed on two different rust colours and also some acrylic black (no two blacks are the same) to further add to the effect. It looks good I think. I also painted the brass gauge glasses with a few coats of acrylic white and then some ‘liquid glass’ on top to give the glassy effect. Finally a gauge glass was printed out and installed on the pressure gauge.
Other progress has included: finishing the rods, installing the turned handrails, adding the blower union to the front of the saddle tank and preparing the dummy inside motion and brake blocks.
All that remains to do is:
- Install the cab rear
- Install the motor(!) and rear frame spacer…this allows me to finish the…dummy inside motion, brake gear, springs etc
- Add the reverser rod
- Add the firebox lower sides around the motor.
Then it’s painting followed by coal in the bunker, nameplates and various copper and brass piping. Then it’s time to install the radio control equipment.
Hopefully it will be ready to be shown at the Hunslet 101 event at the National garden railway show in April; see http://www.16mm.org.uk/nationalshow2010.htm
Colin
Colin

Here you can see that the slidebars are in place, after much filing, bending, fiddling, altering etc and they slide well. This took over an hour to sort.
Also installed are the handbrake, reverser and coupling hooks. I have decided to add a three link chain and hook to the engine as reasonably prototypical.
Next I hope to finish the rods.
I will soon need the motor and extra etches from Slaters – will they be in the post today?
Colin


(note: due to the compensation on the chassis it leans forward at the moment, so my hand is there to show it sitting correctly.)
The engine is really coming on now. The following have been added:
- Wheels in their axleboxes, compensation beam in and retaining plates to keep the axleboxes from falling out (8 x 10BA screws keep them in!)
- Steam pipe casting to side of smokebox
- Buffers
- Cab sides and bunker, plus coal hatch.
- Cranks and rear crankpins
- The handbrake has been put together but not finally assembled (note it is just placed on the model above and so is shown leaning)
and the slidebars and cylinder covers have been filed and fiddled with until they slide nicely. These are ready for installation, as are the rods, which have been reamed to take the crankpin bushes. Tonight I hope to install all this.
The rear of the cab has also been folded up ready and can be installed soon.
The resin firebox really needs painting before I install the controls. Being resin the instructions suggest just a light spray of black, so if we get any dry(!) weather I’ll give that a go so I can install the backhead fittings.
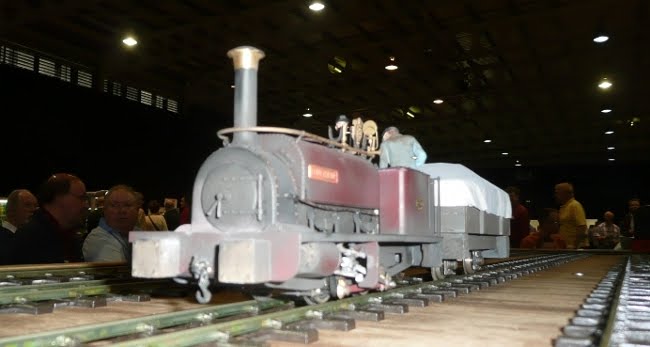
I’m really pleased with it – did I really build this?
Colin


Progress has been good (very good) over the weekend. The backhead fittings have all been test assembled and will now be stored until the firebox is painted as most are brass anyway. The steam turret for the top of the firebox is similarly ready.
The main progress has however been on the frames, with the following completed:
- rods laminated and cleaned up.
- Motion brackets folded and attached to frames.
- Frames attached to footplate and front and middle spacers attached too. The rear spacer has to wait as the new motor (on its way from Slaters) has different fittings.
- The front and rear buffer beams have been attached.
- The axleboxes are on their way to being completed and the cranks have been cleaned up ready.
- The cylinders are attached and couplings were added front and rear into their pockets
- Plus loads of other components have been cleaned up ready for installation such as cab steps, cylinder covers, springs, buffers etc
The only errors so far as 1) I managed to file off two tabs on the end of one of the frames, but with careful soldering have managed to get around that problem, it just made it a little harder than it needed to have been and 2) I accidentally filed off a rivet, but frankly can’t get too worried about that and these could be recreated with paint effects anyway. I filed off the corresponding rivet on the other side so it looks balanced anyway.
Colin
Well firstly wagon progress : the two Slater's Dinorwic slate wagons have been made up, the first one going together far easier than the second, which required some redrilling of the holes for the little brass turnings. I’m still not 100% happy with it and may fiddle more, but generally we have two complete (except for couplings) wagons.

Turning to the engine, much has been achieved. Firstly the motor has been sent off to Slater’s with a cheque for £7.50. This should return as an upgraded faulhaber 2030 motor, more up to the job following feedback from people who have already completed the kit.
The boiler has had the fire irons, handrail and tank top filler added – the filler lid had a brass knob soldered onto it before being glued to the resin. The smokebox has had its three brackets plus the chimney and door dart fixed on. Underneath three 8BA tapped inserts have been sunk into the resin and lots of pilot holes drilled out ready. Powerbond has come in mighty useful.
Next the frames were cut out and laminated. The footplate has had its valances added and the buffer beam folded square.
In addition all the riveting has been done, thanks to Dad’s clever steel nail and a small hammer method . I am very pleased with how the rivets have come out.

Next there are some captive nuts to fix to the frames, some holes to drill out (that should have been etched out, but have only managed to be etched on one part of the frames, not the other!) and brake rodding bearings to add.
Colin

Firstly, here is my garden on a damp December morning taken from the 1st floor. The idea is to link the garage with the shed via an L shape. You can see the levels problem and the need for embankments and a viaduct just ahead of the garage.

I have done some preparatory work on the two Slaters kits, mostly to do with removing the casting nibs on the resin castings. The De Winton already starts to look like an engine with just half and hour’s work! Nothing is attached yet though.
I have also drilled out all the holes on the Quarry Hunslet’s tank and smokebox for handrails, fire iron brackets, smokebox door dart etc

On the waggon front, I have mostly completed a Cooper Craft LNWR coal waggon and have started work on two Dinorwic slates.
Colin

