Thursday, 25 March 2010

Coupled and ready to go

P1080786 P1080787

I have now completed the electrical and mechanical links between loco and wagon.  The couplings are simple chain links and the electrical connector is of the futaba type and is relatively unobtrusive.

My wife says that the wagon looks like it’s got a bomb in it!  This will be covered by a tarpaulin.

The only other bits that are necessary to complete before the show are to attach the nuts on the end of the big end with retaining compound as they keep working loose and to add some brasso to the slidebars to ensure they run nicely.

Friday, 12 March 2010

Done!

P1080722 P1080715 P1080716  P1080718 P1080719 P1080720

Just in time for the family to inspect tomorrow…  The motor needs it’s electrical connector to the accompanying wagon soldering on and the wagon still needs some work, but the loco is basically complete.

I have had second thoughts on the bucket as I believe it to be a bit out of scale when comparing it with shots of a similar engine with bucket on this site http://www.penmorfa.com/Slate/Dinorwic-1967-4.htm

Nearly there

P1080714 P1080710 

Coal in bunker, copper pipework added, nameplates on and various final detailing nearly finished. 

Tuesday, 9 March 2010

A bit of progress

I'm now abroad so there will be no progress until Friday but before I went today I managed:

- To attach the main blower pipe (copper) between the smokebox side and the cab
- To cut to length 4 copper pipes to be installed on the backhead
- Added weathering powders around the smokebox door and cab floor
- Added rust dry brushed onto the filler cap and smokebox rivets
- Touched up a few areas such as the handrails

Nearly there now!

Monday, 8 March 2010

Reassembled

P1080708

Here we are after an hour of painstaking reassembly tonight.  It is incredible how a paint thickness of a few microns can cause parts to stop fitting as they did – the handrail had to be stripped back to brass to get in in and the firebox didn’t fit into the boiler without fettling too.  The motion is all connected up and the motor reinstalled – not without having to resort to using superglue on a screwdriver to get the screws back in! 

The handrail and brake gear cross rods are now glued in.

What remains to be done?

- Install nameplates

- Touch up areas where paint has got knocked/missed.

- Glue in driver/fireman/bunker false floor/bucket (add sand into bucket too)

- Add coal to bunker bottom hatch, rust to rivets and possibly some water stains near the filler hatch.  Add weathering powders around cab floor and smokebox door.

- Reinstall rear coupling (had to be removed to get larger motor in/out)

- Install buffers on accompanying wagon at same height as loco and add couplings for that wagon (fabricated tonight ready).

- Install power coupling between loco and wagon

- Design some kind of tarpaulin for accompanying wagon (painted bacofoil?)

- Add copper pipework to loco between smokebox and cab and at bottom of gauge glasses.

- test loco and then fix 10ba nuts on big end with retainer in the thread

- Find a suitable box for storage/transport.

- Attend Stoneleigh show.

Progress update

P1080694 P1080692

As you can see above further digging around the garden planting various shrubs and bulbs has created a large pile of clay.  This has been placed such that it can be moulded into an embankment at the far end and will include a loop around so that continuous running is possible.  The point will be sprung – I must read up on how to do this!

and work has not stopped on Rough Pup either.  Below you can see the major parts prior to reassembly.

P1080696

Work has included:

- Weathering the driver and fireman.

- Weathering the brass handrail.

- Working out where the copper pipe runs go.

- Weathering the firebox to match the rest of the engine and dirtying up the brass safety valves (but not the whistle) as shown in many photos of the engines at work.

- Painting the nameplates red and then distressing them.

- Painting the hornguides and then weathering them.

- Freeing the slidebars from the inevitable sticking after weathering.

- Drilling two small holes in the rear buffer beam to allow the motor leads to nicely travel across to the running wagon.

- Weathering the running wagon to match.

- Soldering together the radio control circuitry (except the motor which will need to be installed in the engine first.  This is shown below.

P1080697

- Building a false floor for the coal bunker and glueing coal on top of it.

- Preparing for reassembly of the loco.

So, the next step is reassembly followed by some dry brushing to add rust and weathering powders for texture.  Note the expanded polystyrene blob below which will be used for adding random textures of powder.

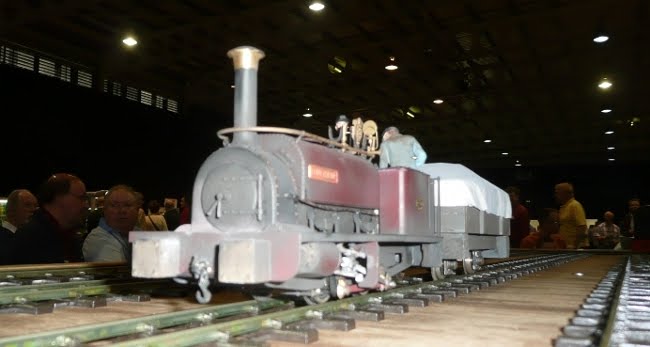
P1080699

Saturday, 6 March 2010

Foundations and a bucket

Firstly much excavating was done today to dig out the general form of a rock cutting and to see how much I could sensibly even out the gradients of the line.  This is necessary as we are planning to plant up the border around the railway soon.

The soil slopes will be stabilised with ground cover plants and the like and the track will be laid on a concrete mix with gravel drainage 'ditches' alongside.  Into the concrete will be inset wooden pieces allowing the track to be nailed to it.  Finally ballast will be added around the track.  The far corner will become a kind of slate quarry scene and one upstanding piece was added as a kind of marker of things to come.

P1080679 P1080680 P1080688 P1080690

I also used my real rust on a bucket - here is the before and after...

P1080686