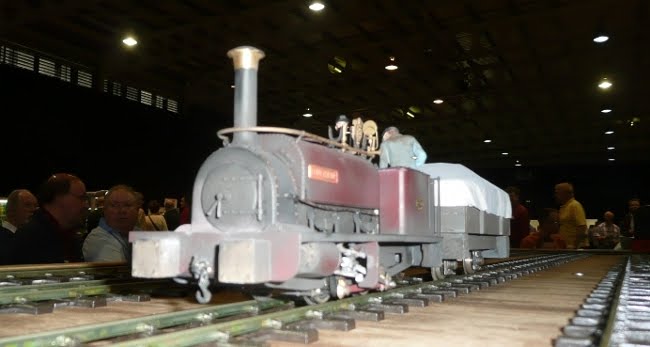
Check out this video of my engine passing some of the other 100 Hunslets!
http://www.youtube.com/watch?v=QNivf5k10_M
A great time was had by all (show report coming soon) and Rough Pup performed well.
Showing posts with label rough pup. Show all posts
Showing posts with label rough pup. Show all posts
Monday, 12 April 2010


Thursday, 25 March 2010
Coupled and ready to go


I have now completed the electrical and mechanical links between loco and wagon. The couplings are simple chain links and the electrical connector is of the futaba type and is relatively unobtrusive.
My wife says that the wagon looks like it’s got a bomb in it! This will be covered by a tarpaulin.
The only other bits that are necessary to complete before the show are to attach the nuts on the end of the big end with retaining compound as they keep working loose and to add some brasso to the slidebars to ensure they run nicely.
Friday, 12 March 2010
Done!


Just in time for the family to inspect tomorrow… The motor needs it’s electrical connector to the accompanying wagon soldering on and the wagon still needs some work, but the loco is basically complete.
I have had second thoughts on the bucket as I believe it to be a bit out of scale when comparing it with shots of a similar engine with bucket on this site http://www.penmorfa.com/Slate/Dinorwic-1967-4.htm
Nearly there


Coal in bunker, copper pipework added, nameplates on and various final detailing nearly finished.
Monday, 8 March 2010
Reassembled

Here we are after an hour of painstaking reassembly tonight. It is incredible how a paint thickness of a few microns can cause parts to stop fitting as they did – the handrail had to be stripped back to brass to get in in and the firebox didn’t fit into the boiler without fettling too. The motion is all connected up and the motor reinstalled – not without having to resort to using superglue on a screwdriver to get the screws back in!
The handrail and brake gear cross rods are now glued in.
What remains to be done?
- Install nameplates
- Touch up areas where paint has got knocked/missed.
- Glue in driver/fireman/bunker false floor/bucket (add sand into bucket too)
- Add coal to bunker bottom hatch, rust to rivets and possibly some water stains near the filler hatch. Add weathering powders around cab floor and smokebox door.
- Reinstall rear coupling (had to be removed to get larger motor in/out)
- Install buffers on accompanying wagon at same height as loco and add couplings for that wagon (fabricated tonight ready).
- Install power coupling between loco and wagon
- Design some kind of tarpaulin for accompanying wagon (painted bacofoil?)
- Add copper pipework to loco between smokebox and cab and at bottom of gauge glasses.
- test loco and then fix 10ba nuts on big end with retainer in the thread
- Find a suitable box for storage/transport.
- Attend Stoneleigh show.
Friday, 5 March 2010
Oh my word

Progress:
- buffer beams and rods painted red (3 times)
- buffers painted natural wood colour and the dry brushed with black and grime colours
- whole model airbrushed using a mix of black and railmatch frame grime.
I’m absolutely gobsmacked that I have built and painted this – it’s ridiculous how on earth have I managed it?
Thursday, 4 March 2010
Disaster, recovery and the plan

I started spraying the boiler/tank/smokebox assembly and this is what happened! The other side was great. damn!
So I stripped all the paint off using cellulose thinners (smelly stuff!) and then used a fibreglass brush on this area…I tried again and hey presto… it’s fine. Two coats have been applied.
Then the chassis was sprayed matt black too. One footplate has also had some acryllic black (slightly browny) dry brushed on to give a kind of oily appearance. This is a test to see what it looks like. It will be airbrushed over anyway but I hate uniform colours like the matt black which is not true to life. Real footplates have oily mank on them, so mine will too. Here they are drying for the night.

The plan is to use the tamiya masking tape pictured to mask off the panels and then airbrush on the phoenix crimson lake (dull) using airbrush thinner from railmatch (Ian Rathbone says normal white spirit is just as good, but I had already bought this so why not give it a go). The buffer beams and rods (once they have been brush primed) will be bright red (humbrol enamel probably but maybe acryllic I haven’t decided yet).

Primed!

and here is the chassis primed. The propagator gives you some idea of the size of the extractor. It looks good (I can only see one stray fibreglass piece), but even after drying with a hairdryer I’m going to leave it a while before I start the next coat!
The good news is that the slidebars still slide! cool!
Ready for primer


So after much brushing and cleaning I rubbed shiny sinks on the chassis which got rid of much of the tarnish and then rubbed vim onto it to neutralise. After a while drying I went to have a look (half time in the England match) and a few areas had gone green – this is where the vim had attacked flux deposits. These were rubbed off and the model washed again. A few water stains were then removed and one piece of the inside valve gear required re-soldering. A final clean around that and we’re ready to go.
I have decided to prime the bottom first as if there are any major problems they shouldn’t show up. I have used some heat shrink tubing to cover the connecting rods and will mask off the piston rods with masking tape.
Fingers crossed!
Wednesday, 3 March 2010
Cleaning up, ready for painting

April 10th is the National Garden Railway Show and 16mm association AGM at Stoneleigh Warwickshire. As part of this event the planners are hoping for 101 Hunslets to be on show alongside the star attraction – the newly restored Edward Sholto, previously of Penrhyn Quarries and latterly stored in the USA.
My Rough Pup is registered to attend and although it could do so in current condition, it would be far nicer to have it there painted.
Thus prep work started last night with the boiler/smokebox lifted off, the already painted firebox removed and the motor, gears and wheels lifted out.
Now its time to clean her up. My weapons of choice are shown above:
- Fibreglass brushes of 2,4,8 and 10mm for cleaning up, giving the brass a key for the paint to adhere to and general surface improvement (removing solder etc)
- A chisel scapel and screwdriver to remove blobs of solder
- A brass brush, cosmetics brush, paintbrush, toothbrush and foam brush for getting into corners and washing cleaning stuff around.
- Acid cleaners – shiny sinks (cream) and viakal to really buff up the brass plus acetone (cheap nail varnish remover) to use sparingly oN really grubby bits.
- Alkaline cleaner VIM to remove flux deposits.
- I will also use the airbrush to blow away any water that gets under laminations etc and also get rid of those pesky fibreglass bristles.
The plan is as follows:
- Clean up with fibreglass brushes etc
- buff up brass with acid cleaner
- neutralise with alkaline cleaner
- wash thoroughly with water and let dry overnight
- use airbrush to finalise drying.
- mask off slidebars and connecting rods
- prime with halfords car primer (red oxide as paint on top of it could later be rubbed down to reveal this as rust).
- airbrush chassis black.
- airbrush sides and back red.
- mask off brass details on boiler/tank and prime brass boiler grey, paint resin directly red (no primer required).
- Line out, add nameplates
- Weather using airbrush and t-cut.
and all before April 10th.
Oh and at some point finish the electrical connection and couplings to the running wagon, install battery/ESC and Rx and cover with tarpaulin!
Subscribe to:
Posts (Atom)